This 40” x 40” quilt is perfect for a new born, the colours are neutral, yet soft and warming.
What you will need: ⦁ Sewing machine ⦁ Fusible web ⦁ Needle, pins and thread ⦁ Rotary cutter or scissors and cutting mat ⦁ ‘Step into spring’ fabric available Hobbycraft cut from 110cm roll. ⦁ Bias binding ⦁ Wadding
Amount of fabric needed: ⦁ Pale orange/white fabric: half metre - from this cut: ⦁ Four rectangles of 5.5”x 10.5”. ⦁ One rectangle that is 10.5”x 20.5” ⦁ Grey tree fabric: half metre - from this cut: ⦁ Two rectangles of 5.5”x 20” ⦁ Two rectangles of 5.5”x 30.5” ⦁ Turquoise tree fabric: half metre- from this cut: ⦁ One rectangle that is 5.5” x 30.5” ⦁ Deep orange fabric: half metre – from this cut: ⦁ Two rectangles of 5.5” x 30.5” ⦁ Two rectangles of 5.5” x 20.5” ⦁ Save what is left over for making the flowers. ⦁ Wadding 41” x 41” ⦁ Pale blue/white fabric: half a metre ⦁ Plain white fabric: one metre ⦁ Bias binding: I used 170” of satin readymade bias
Step 1:
Start by washing, drying and ironing all the fabric needed, then cut out the pieces.

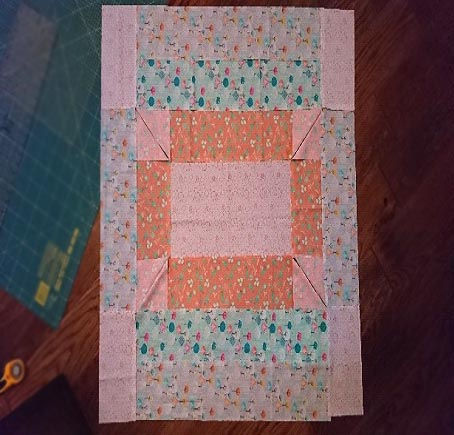
I used a pale orange cotton thread, begin by taking the large pale orange rectangle, and sewing the four deep orange rectangles along each edge making sure the design on the fabric is running in the same direction on each vertical and each horizontal.
A ¼” seam allowance has already been added to the fabric cuts, remember to sew right sides together.
When sewing the longer vertical pieces, make sure you leave a 5” piece of fabric off each end.
Iron the seam towards the darker fabric.
Step 2: For the corners, fold top edge a 45-degree angle from the point of the seam and the outer corner, press with iron and then sew along creased edge, repeat this for the other three corners.

Pin excess fabric in corner until next out layer of fabric has been added.
It’s important to square up the edges at this point before adding the next outer layer of fabric.
Press quilt.

Step 3:
Next take your grey tree fabric and sew along the shorter edge with the pale orange/white fabric, making one long strip for the top and the bottom of the quilt, press seams towards the grey fabric.
Put these strips to one side while you sew the turquoise tree fabric with the grey tree fabric – making sure the fabric design is going in the same direction on each side (so fix the grey to different sides of the turquoise).
Press seam towards the turquoise fabric. Straighten up all edges of the pieces you have sewn together. With the right side together, sew the turquoise fabric to the long sides of the main quilt, iron seams towards the turquoise fabric and straighten up any edges. Next take the long grey tree fabric with pale orange/white fabric (previously sewn together) and sew to the top and bottom of the quilt, making sure the fabric direction is correct and the seam match with the vertical seams.
Press seams towards the outer edge.

Step 4: Now we can begin the back of the quilt.
Sew the two white pieces of white fabric to either side of the longest edge of the pale blue/white fabric.
Press seams towards the blue/white fabric.

Let’s make our quilt sandwich, (top quilt, wadding and backing fabric) using 505 temporary adhesive spray, baste and pin this in place.
Step 5:
Take the heart template and cut this out of card, then randomly place this in different places over the quilt and mark with a frixon pen (this enables you to iron off any marks when the quilting is complete)

Begin in the corner of your quilt and work your way around the quilt with a waving continuous line whilst sewing along all the heart markings. I used a pale cream cotton thread.


Step 6: To make the spring flowers, Using the template, cut out 9 of these flowers by first drawing the template onto the paper side of the fusible web, cut these out and iron them onto the wrong side of the deep orange fabric, then cut the fabric flowers out. (the fusible web will stop the fabric fraying)


Use a blanket stitch either by machine or sew by hand to applique the flowers in place on the quilt (see final diagram to see where to place them).

Step 7:
Trim off any excess wadding from around the edges. Attach the binding to the front of the quilt, sewing neat corners, then slip stitch the reverse by hand.


Your quilt is now complete!

Made by Michelle Roberts for The Craft Cotton Co
Visit her new blog creativeblondeblog.wordpress.com

